Managing Kubernetes Clusters at Scale: An Introduction to Cluster API
What is a Kubernetes Cluster?
A Kubernetes cluster is a group of machines (nodes) that work together to run containerized applications, with two roles:
- Control plane — the “brain”: API server, etcd (state store), scheduler, controller-manager. Decides what should run where.
- Worker nodes — run your actual application containers (grouped into pods), managed by a
kubeletagent on each node.
You talk to the cluster via the API server (kubectl), declare desired state (e.g., “run 3 nginx pods”), and the control plane makes it happen.
                ┌─────────────────────────────┐
                │        Control Plane        │
                │  (usually 1-3 nodes)         │
                │                              │
                │  API Server ── etcd          │
                │      │                       │
                │  Scheduler   Controller-Mgr  │
                └──────────────┬───────────────┘
                               │ schedules pods
        ┌──────────────────────┼──────────────────────┐
        │                      │                      │
 ┌──────▼──────┐        ┌──────▼──────┐        ┌──────▼──────┐
 │ Worker Node │        │ Worker Node │        │ Worker Node │
 │  kubelet    │        │  kubelet    │        │  kubelet    │
 │  ┌───────┐  │        │  ┌───────┐  │        │  ┌───────┐  │
 │  │ Pod   │  │        │  │ Pod   │  │        │  │ Pod   │  │
 │  │(nginx)│  │        │  │(nginx)│  │        │  │(nginx)│  │
 │  └───────┘  │        │  └───────┘  │        │  └───────┘  │
 └─────────────┘        └─────────────┘        └─────────────┘
What Do Pods Actually Run?
Pods run containers — instances of a container image (your app packaged with its code, runtime, and libraries). You build a Docker image, push it to a registry (Docker Hub, ACR, ECR, etc.), and the pod pulls that image from the registry to run it.
Public Cloud vs. Your Own Infrastructure
If you want to run your app on Kubernetes in the public cloud, this is easy: use a managed Kubernetes service — Amazon EKS, Azure AKS, or Google GKE. AWS, Microsoft, and Google run and maintain the control plane for you (API server, etcd, upgrades, cert rotation, node bootstrapping). You just run one command and get a working cluster:
# AWS
eksctl create cluster --name my-cluster --region us-east-1

# Azure
az aks create --resource-group myResourceGroup --name myAKSCluster --node-count 1 --generate-ssh-keys

# GCP
gcloud container clusters create my-cluster --num-nodes=3
No kubeadm, no control-plane VMs to babysit, no manual node joining. kubectl apply your workloads and you’re done.
But what if you’re running on your own infrastructure — on-prem, in a private data center, or on hardware you own? There’s no cloud provider offering to manage a control plane for you. You have to:
- Provision the VMs
- Install kubeadm, run
kubeadm init/jointo bootstrap the cluster - Wire up networking (CNI)
- Handle upgrades, cert rotation, replacing failed nodes
- Do this for every cluster, and keep doing it
This is exactly the gap Cluster API fills. It brings the “managed Kubernetes” experience — declare what you want, the platform handles the rest — to environments where nobody else is managing it for you.
For one cluster, you can do it manually. For 50 clusters across multiple environments? You need automation. That’s where Cluster API comes in.
The Problem: Managing Clusters is Painful
Setting up a Kubernetes cluster means provisioning VMs, installing kubeadm, running kubeadm init, joining nodes, installing a CNI plugin, configuring certificates… and that’s just day one. Then you need to maintain it — upgrades, cert rotation, replacing dead nodes, scaling up workers. All manually. For every cluster.
Imagine doing this for 50 clusters. You’d need a spreadsheet just to track which cluster is on which version.
What if We Could Just Declare It?
Imagine if you could simply declare what you want your clusters to look like:
“I want a cluster named
devwith 1 control plane node and 2 workers, running Kubernetes v1.30.”
“I want a cluster named
stagingwith 1 control plane node and 1 worker, running Kubernetes v1.30.”
And then something just… makes it happen. Creates the VMs, runs kubeadm, installs everything, joins the nodes. You change replicas: 3 and a new worker appears. You change the Kubernetes version and it does a rolling upgrade — new node up, old node drained and deleted, zero downtime.
That is exactly what Cluster API provides. It uses Kubernetes’ own declarative interface — controllers, custom resources, reconciliation loops — to manage Kubernetes clusters.
Essentially: Kubernetes managing Kubernetes. 🐢
What is Cluster API (CAPI)?
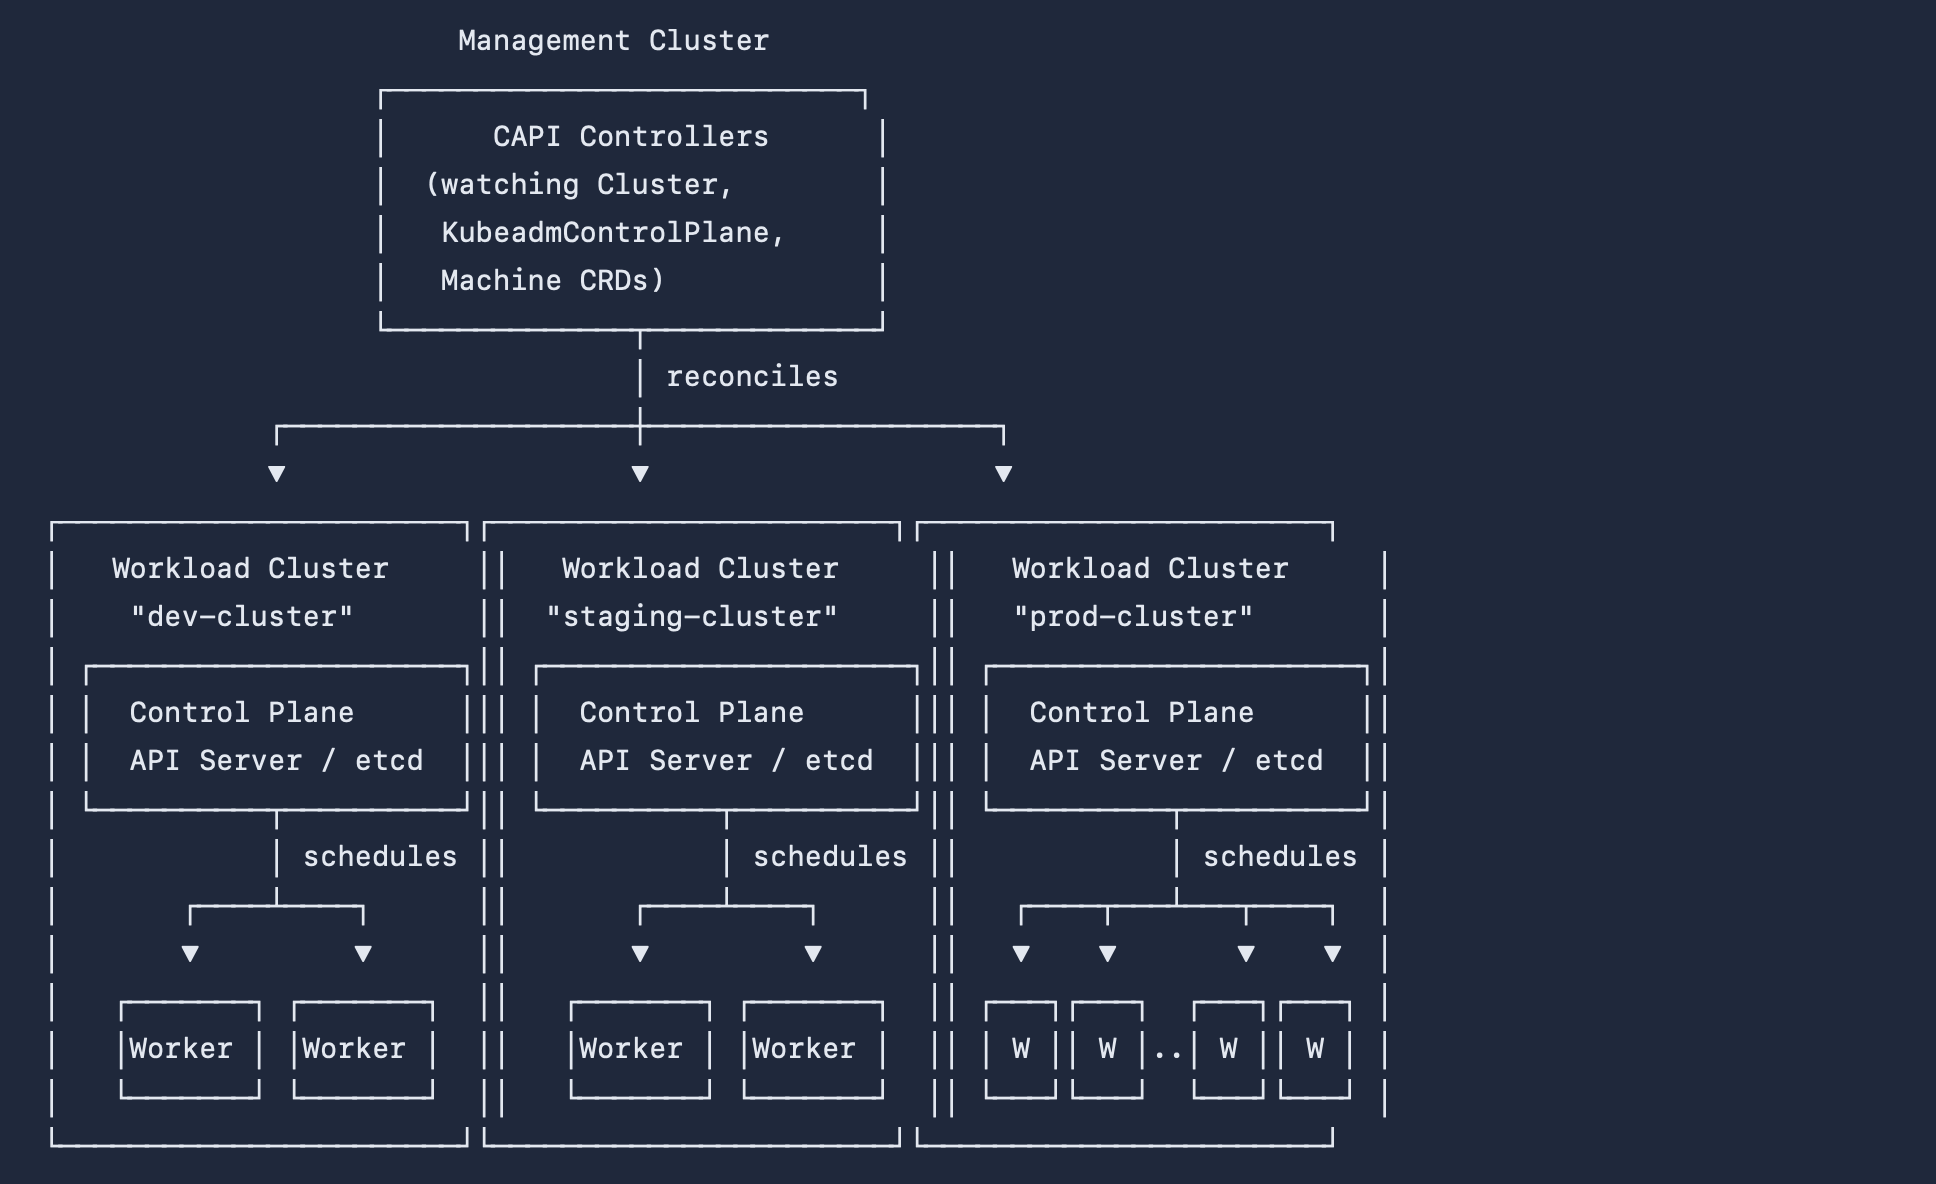
CAPI is a set of controllers that run on a central management cluster and manage the lifecycle of workload clusters. You declare what you want via custom resources (CRDs), and CAPI controllers reconcile reality to match.
Contrast this with the single-cluster diagram earlier: there, one control plane manages pods. Here, one management cluster manages multiple entire clusters.
                         Management Cluster
                    ┌───────────────────────────┐
                    │      CAPI Controllers      │
                    │  (watching Cluster,        │
                    │   KubeadmControlPlane,     │
                    │   Machine CRDs)            │
                    └──────────────┬─────────────┘
                                   │ reconciles
              ┌────────────────────┼────────────────────┐
              ▼                    ▼                    ▼
 ┌───────────────────────┐┌───────────────────────┐┌───────────────────────┐
 │   Workload Cluster     ││   Workload Cluster     ││   Workload Cluster     │
 │    "dev-cluster"       ││  "staging-cluster"     ││   "prod-cluster"       │
 │ ┌─────────────────────┐││ ┌─────────────────────┐││ ┌─────────────────────┐│
 │ │  Control Plane      │││ │  Control Plane      │││ │  Control Plane      ││
 │ │  API Server / etcd  │││ │  API Server / etcd  │││ │  API Server / etcd  ││
 │ └──────────┬──────────┘││ └──────────┬──────────┘││ └──────────┬──────────┘│
 │            │ schedules ││            │ schedules ││            │ schedules │
 │       ┌────┴────┐      ││       ┌────┴────┐      ││   ┌────┬───┴───┬────┐  │
 │       ▼         ▼      ││       ▼         ▼      ││   ▼    ▼       ▼    ▼  │
 │   ┌───────┐ ┌───────┐  ││   ┌───────┐ ┌───────┐  ││ ┌───┐┌───┐  ┌───┐┌───┐ │
 │   │Worker │ │Worker │  ││   │Worker │ │Worker │  ││ │ W ││ W │..│ W ││ W │ │
 │   └───────┘ └───────┘  ││   └───────┘ └───────┘  ││ └───┘└───┘  └───┘└───┘ │
 └───────────────────────┘└───────────────────────┘└───────────────────────┘
CAPI is one level up from what you’re used to. A normal Kubernetes controller (like a Deployment) reconciles pods. CAPI’s controllers reconcile entire clusters — same reconcile-loop pattern (declare desired state → controller makes it real), just applied to a bigger unit: instead of “make sure 3 nginx pods exist,” it’s “make sure this whole Kubernetes cluster — control plane, worker nodes, networking — exists and matches what I declared.”
The Three Providers
CAPI is pluggable. It defines interfaces, and providers implement them. A provider is just a Kubernetes controller (a pod) that watches specific CRDs and does the platform-specific work.
There are three providers that CAPI requires you to define:
1. Infrastructure provider — creates the underlying VMs/machines on the infrastructure.
E.g., “CAPZ” creates VMs on Azure public cloud.
Each platform has its own provider, that knows how to create/manage machines on its infrastructure.
These span three layers of infrastructure:
| Layer | What | CAPI Providers |
|---|---|---|
| Bare metal | OS directly on physical hardware, no hypervisor | Metal3 |
| On-prem virtualized | VMs on hypervisors you own/manage | CAPV (vSphere/ESXi), CAPO (OpenStack/KVM) |
| Cloud | VMs on someone else’s hypervisors | CAPZ (Azure), CAPA (AWS), CAPG (GCP) |
Cloud and on-prem virtualized are technically the same thing (VMs on a hypervisor) — the difference is just who owns the hardware.
When CAPI says “create a Machine,” the infrastructure provider calls the platform API to spin up a VM (or a Docker container, in CAPD’s case).
2. Bootstrap provider — turns a blank VM into a Kubernetes node.
It generates a cloud-init script that installs kubelet, containerd, and runs kubeadm init (for the first control plane node) or kubeadm join (for additional nodes). The default is the Kubeadm bootstrap provider.
This script gets injected into the VM at creation time. The VM boots, cloud-init runs, and the machine becomes a Kubernetes node — all automatically.
3. Control plane provider — manages the control plane lifecycle.
The default is KubeadmControlPlane (KCP). It handles:
- How many control plane nodes to create (from
replicas) - Rolling upgrades (create new node → wait for ready → drain old → delete old)
- Certificate rotation
- etcd membership
How They Work Together
You create: Cluster CR + KubeadmControlPlane CR (replicas: 1, version: v1.30.0)
                    ↓
KCP:         Creates a Machine CR
                    ↓
Bootstrap:   Generates cloud-init script (kubeadm init)
                    ↓
Infra:       Creates VM with cloud-init injected
                    ↓
VM boots:    cloud-init → kubeadm → kubelet registers → node Ready ✅
                    ↓
KCP:         "Control plane is up, workers can join now"
                    ↓
MachineDeployment → creates worker Machines → same flow → workers Ready ✅
You never SSH into a machine. You never run kubeadm. You declare the desired state and controllers make it happen. Same pattern as Kubernetes itself — just one level up.
The Turtle Stack
Each layer automates the one below:
Docker      → manages containers
Kubernetes  → manages containers across a cluster
Cluster API → manages the clusters themselves
And CAPI uses the same Kubernetes patterns (controllers + CRDs) to do it. It’s the same turtle at every level. 🐢
Tutorial: Let’s Build It
Let’s for a second pretend that a Docker container is a VM. Using CAPD (Cluster API Provider Docker), we can create full Kubernetes clusters locally — same CAPI controllers, same CRDs, same lifecycle, just Docker containers instead of real VMs.
Prerequisites
# Install Docker
sudo apt-get update && sudo apt-get install -y docker.io
sudo systemctl start docker

# Install kind (Kubernetes in Docker)
curl -Lo ./kind https://kind.sigs.k8s.io/dl/v0.24.0/kind-linux-amd64
chmod +x ./kind && sudo mv ./kind /usr/local/bin/

# Install kubectl
curl -LO "https://dl.k8s.io/release/$(curl -L -s https://dl.k8s.io/release/stable.txt)/bin/linux/amd64/kubectl"
chmod +x kubectl && sudo mv kubectl /usr/local/bin/

# Install clusterctl (the CAPI CLI)
curl -L https://github.com/kubernetes-sigs/cluster-api/releases/latest/download/clusterctl-linux-amd64 -o clusterctl
chmod +x clusterctl && sudo mv clusterctl /usr/local/bin/

# Bump inotify limits (needed for Docker-in-Docker)
sudo sysctl fs.inotify.max_user_watches=524288
sudo sysctl fs.inotify.max_user_instances=512
Step 1: Create the Management Cluster
We need a Kubernetes cluster to run CAPI on. We use kind to create one — this is just a regular K8s cluster in a Docker container:
💡 Production Note (Bootstrap vs. Management Cluster): In production, you typically create a temporary local
kindcluster (called a bootstrap cluster), use it to deploy a production-grade cluster in your cloud provider, and runclusterctl moveto pivot CAPI onto that cloud cluster. Once transferred, you destroy the local bootstrap cluster, leaving the cloud cluster as your permanent management cluster. For our local CAPD tutorial, ourkindcluster serves directly as the management cluster!
cat > /tmp/kind-config.yaml <<EOF
kind: Cluster
apiVersion: kind.x-k8s.io/v1alpha4
nodes:
  - role: control-plane
    extraMounts:
      - hostPath: /var/run/docker.sock
        containerPath: /var/run/docker.sock
EOF

kind create cluster --name capi-mgmt --config /tmp/kind-config.yaml
The Docker socket mount is needed so CAPD can create new containers (our fake “VMs”) from inside the kind cluster.
Step 2: Install CAPI + Providers
export CLUSTER_TOPOLOGY=true
clusterctl init --infrastructure docker
This installs four controllers onto the management cluster:
cluster-api                    → CAPI core
bootstrap-kubeadm              → Bootstrap provider (generates cloud-init)
control-plane-kubeadm          → KCP (manages control plane)
infrastructure-docker          → CAPD (creates Docker "VMs")
Wait for everything to be ready:
kubectl wait --for=condition=Available deployment --all --all-namespaces --timeout=180s
Step 3: Create Workload Clusters
Now the fun part — declare two clusters and watch CAPI build them:
# dev cluster: 1 control plane + 2 workers
clusterctl generate cluster dev-cluster \
  --flavor development \
  --kubernetes-version v1.30.0 \
  --control-plane-machine-count 1 \
  --worker-machine-count 2 \
  | kubectl apply -f -

# staging cluster: 1 control plane +3 workers
clusterctl generate cluster staging-cluster \
  --flavor development \
  --kubernetes-version v1.30.0 \
  --control-plane-machine-count 1 \
  --worker-machine-count 3 \
  | kubectl apply -f -
Watch CAPI create Machines, spin up Docker containers, and bootstrap Kubernetes:
kubectl get clusters -A
kubectl get machines -A
docker ps  # see the "VMs" as Docker containers!
Step 4: Install CNI
Nodes will show NotReady until you install a CNI (Container Network Interface) plugin. CNI gives pods their networking — it runs as a DaemonSet on every node and programs the network so pods can talk to each other across nodes.
There are different CNI options:
| Plugin | Approach | Tradeoff |
|---|---|---|
| Calico (VXLAN) | Overlay — wraps packets in UDP tunnels | Works anywhere, slight overhead |
| Calico (BGP) | Native routing — advertises pod routes to routers | Faster, needs router support |
| Flannel | Overlay (VXLAN) | Simple, fewer features |
| Cilium | eBPF-based | Advanced observability |
For this tutorial, we use Calico:
clusterctl get kubeconfig dev-cluster > /tmp/dev-cluster.kubeconfig

kubectl --kubeconfig=/tmp/dev-cluster.kubeconfig \
  apply -f https://raw.githubusercontent.com/projectcalico/calico/v3.28.0/manifests/calico.yaml
After a minute, all nodes go Ready:
kubectl get machines -A
# NAME                           CLUSTER       READY   PHASE
# dev-cluster-xxxxx-cp           dev-cluster   True    Running  ← CP
# dev-cluster-md-0-xxxxx-abc     dev-cluster   True    Running  ← Worker
# dev-cluster-md-0-xxxxx-def     dev-cluster   True    Running  ← Worker
Step 5: Deploy an App
Deploy to your workload cluster — no SSH, just kubectl with the kubeconfig:
kubectl --kubeconfig=/tmp/dev-cluster.kubeconfig \
  create deployment nginx --image=nginx --replicas=3

kubectl --kubeconfig=/tmp/dev-cluster.kubeconfig \
  get pods -o wide
# Pods spread across your 2 worker nodes!
Step 6: Explore
# See the ownership chain
kubectl get machines -o custom-columns=\
NAME:.metadata.name,\
CLUSTER:.spec.clusterName,\
OWNER:.metadata.ownerReferences[0].kind,\
PHASE:.status.phase

# Exec into a "VM" — see what kubeadm set up
docker exec -it <cp-container-name> bash
ls /etc/kubernetes/manifests/   # apiserver, etcd, scheduler, controller-manager
crictl ps                       # containers running inside the "VM"

# Kill a worker — watch CAPI self-heal
docker rm -f <worker-container-name>
# CAPI detects missing node → creates a replacement automatically
# Note: this isn't instant — may have to wait a while.
What You Just Built
Your machine (Docker)
├── capi-mgmt-control-plane              ← Management cluster
│   └── CAPI controllers watching CRDs
│
├── dev-cluster-lb                       ← Dev cluster load balancer (HAProxy)
├── dev-cluster-xxxxx-cp                 ← Dev cluster CP "VM"
│   └── apiserver, etcd, scheduler
├── dev-cluster-md-0-xxxxx-abc           ← Dev worker "VM"
├── dev-cluster-md-0-xxxxx-def           ← Dev worker "VM"
│
├── staging-cluster-lb                   ← Staging cluster load balancer (HAProxy)
├── staging-cluster-xxxxx-cp             ← Staging cluster CP "VM"
├── staging-cluster-md-0-xxxxx-abc       ← Staging worker "VM"
├── staging-cluster-md-0-xxxxx-def       ← Staging worker "VM"
└── staging-cluster-md-0-xxxxx-ghi       ← Staging worker "VM"
10 Docker containers. 3 Kubernetes clusters. All managed declaratively through CRDs.
(The *-lb containers are HAProxy load balancers CAPD puts in front of each workload cluster’s control plane — this is what clusterctl get kubeconfig actually points you at, so the control plane can scale to multiple replicas without clients needing to track which node is which.)
In production, swap --infrastructure docker for --infrastructure vsphere or --infrastructure aws — same YAML, real VMs. That’s the power of CAPI’s pluggable architecture.
No SSH. No manual kubeadm. No spreadsheets. Just declare what you want, and Kubernetes makes it happen — for your clusters, not just your apps. 🐢
Note: this blog post is partly made with AI